Creating a macOS screensaver
I tend to browse Hacker News obsessively over the course of a day, and this morning I came across this post where somebody had jailbroken their old Kindle (I didn’t even know you could do that 😱) and repurposed it into a fancy clock displaying literary quotes .
I managed to dig up my old second-generation Kindle (which turned 9 this year!) thinking I’d charge it up, jailbreak it, and follow along with his tutorial as a fun Sunday morning project. I luckily purchased the case too, so I’d probably be able to set upright on my desk at work to make for a decent clock 🕐.

Sadly the battery is bust – the charging indicator lights up only briefly after plugging in the micro USB cable, and after some research I came to the conclusion that the battery is to blame. Leaving it on charge with the indicator off for about an hour produced no results, so I gave up.
I looked for other Kindle-sized devices I could use for this project, and came across nothing but an old Android tablet. I considered using that for a moment – it would be much easier (I’d probably just write a small app to iterate and pick the correct image from the bundle provided on the Instructables site, based on the time) but the novelty of displaying literary quotes on an e-ink display would be gone. I also had concerns about battery life – I’d probably need to have the tablet plugged in all day, and we’re already short of power points at work.
So I started brainstorming things I could repurpose for my literary clock which I already had at work 🤔
We have an old laptop hooked up to a TV 📺 which could work, but it seems a bit excessive to display literary quotes to half of the floor. Hmm…what about my computer? I’ll always have it at work; it’s hooked up to a reasonably sized screen, and it’s not really doing anything when I’m away from my desk. Maybe I can hack together a screensaver 🖼️ that does the same thing!
Where to begin?#
How do you even make a screensaver? Do people actually make their own? Do people actually use screensavers anymore?
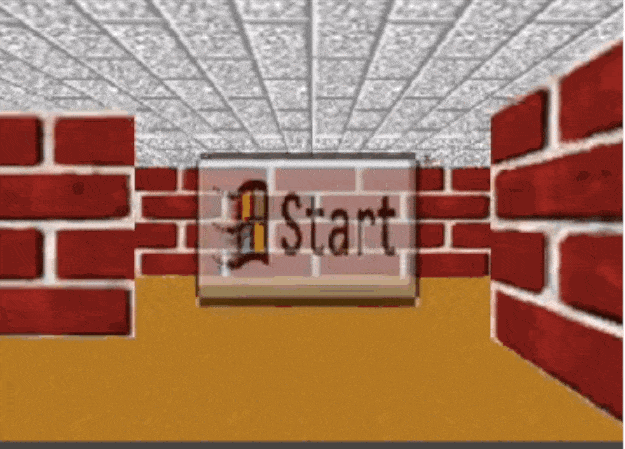
I don’t think I’ve used a screensaver on my computer since I was in primary school 🎒, way back when we still had the legendary Windows 98 maze:
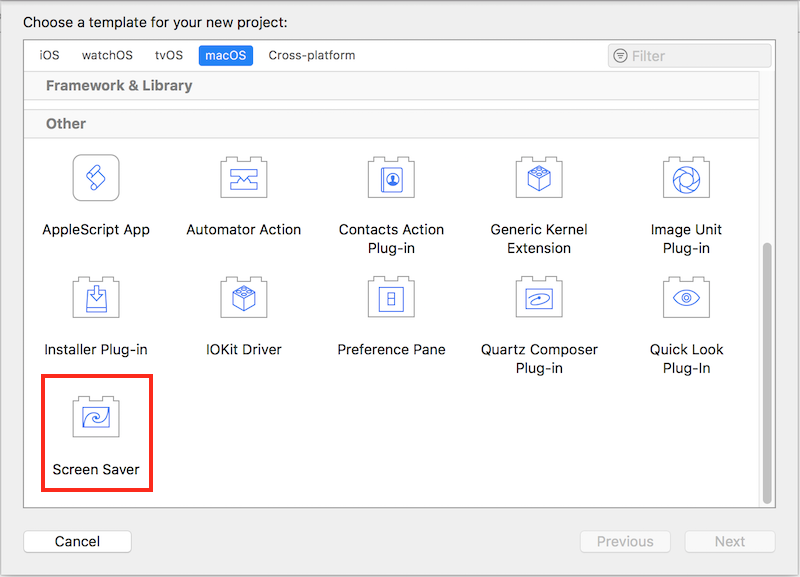
Google is probably the best place to start I thought. Searching “making a macos screensaver” brought me here , which provided a great kick-start to a Swift-based Xcode project for screensavers. Turns out Xcode still maintains a dedicated macOS project type for screensavers. Amazing!
Baby steps#
Creating a project with the Screen Saver template gives you an Objective-C header and messages file. I trashed these immediately and created a new Swift class as the entry point into the screensaver.
import ScreenSaver

class Main: ScreenSaverView {

    override init?(frame: NSRect, isPreview: Bool) {
        super.init(frame: frame, isPreview: isPreview)
    }

    required init?(coder decoder: NSCoder) {
        super.init(coder: decoder)
    }

    override func animateOneFrame() {

    }

    override func draw(_ rect: NSRect) {
        super.draw(rect)
    }
}
We import the ScreenSaver framework and subclass ScreenSaverView. There’s a couple of functions we should override to control the behaviour of the screensaver. The Apple docs
explain the screensaver workflow quite well, but the gist of it is:
- The
init(frame:isPreview:)function is called. We’ll use this to initialise some stuff that we need to display the quotes and time. - The
draw(_:)function is called, which you should use to establish the stage of the screensaver. animateOneFrame()is called each time a new frame is to be drawn by the screensaver.stopAnimation()is called. One caveat is thatanimateOneFrame()may or may not continue to execute after the screensaver has stopped. Good to note, but probably won’t impact anything we do.
Cool 😎, so now we have a basic Swift class to handle how our screensaver is rendered. Let’s add some code to draw the current time onto the stage whenever the animateOneFrame() function is called.
import ScreenSaver

class Main: ScreenSaverView {
    override init?(frame: NSRect, isPreview: Bool) {
        super.init(frame: frame, isPreview: isPreview)
    }

    required init?(coder decoder: NSCoder) {
        super.init(coder: decoder)
    }

    /**
     animateOneFrame is called every time the screen saver frame is to be updated, and
     is used to re-draw the time/quote if required.
     */
    override func animateOneFrame() {
        let time = getTime()

        clearStage()
        drawText(time)
    }

    /**
     getTime returns the current time as a formatted string.

     - Returns: A new string showing the current time, formatted as HH:mm:ss
     */
    func getTime() -> String {
        let date = Date()
        let formatter = DateFormatter()
        formatter.dateFormat = "HH:mm:ss"

        return formatter.string(from: date)
    }

    /**
     drawText draws a provided string to the bottom-left of the stage.

     - Parameter text: The text to draw onto the stage.
     */
    func drawText(_ text: String) {
        NSColor.black.set()
        text.draw(at: NSPoint(x: 100.0, y: 200.0), withAttributes: nil)
    }

    /**
     clearStage clears the stage, by filling it with a solid colour.
     */
    func clearStage() {
        NSColor.red.setFill()
        NSRectFill(self.bounds)
    }

    /**
     draw is called to initialise the stage of the screen saver.
     */
    override func draw(_ rect: NSRect) {
        super.draw(rect)

        let time = getTime()

        clearStage()
        drawText(time)
    }
}
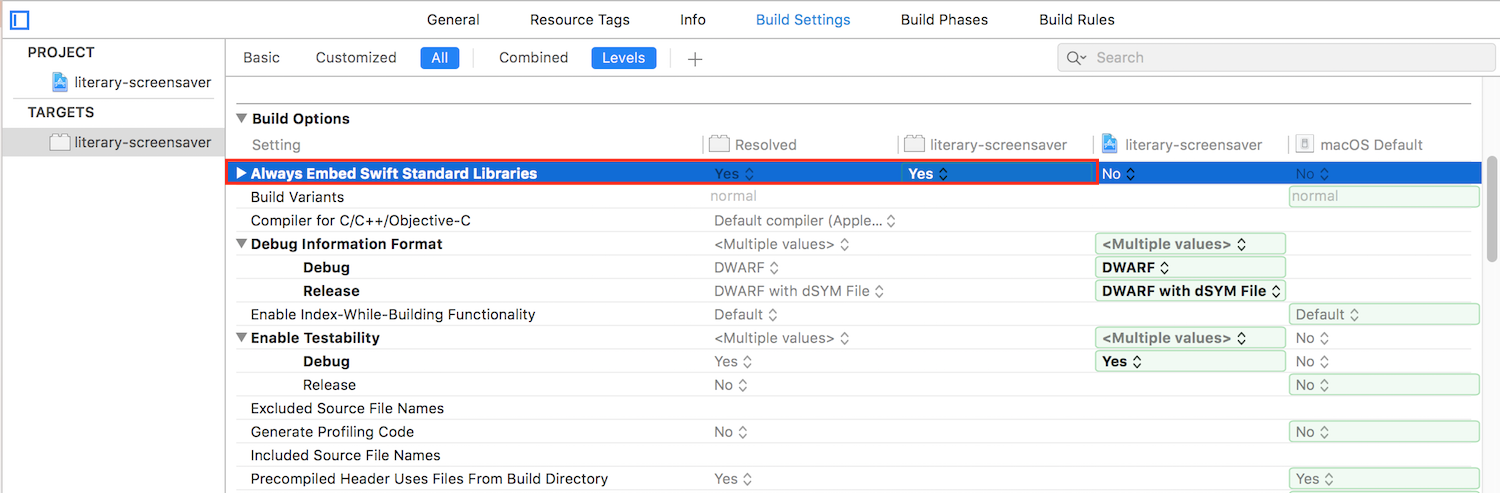
Before we go ahead and build our project, there’s a couple of settings we need to change since we switched from Objective-C to Swift.
- In the
info.plistfile, we need to change thePrincipal classattribute to the name of the Swift class we created.

- In the Target (not the Project) build settings, change the
Always Embed Swift Standard Librariesattribute toYesat the target level.
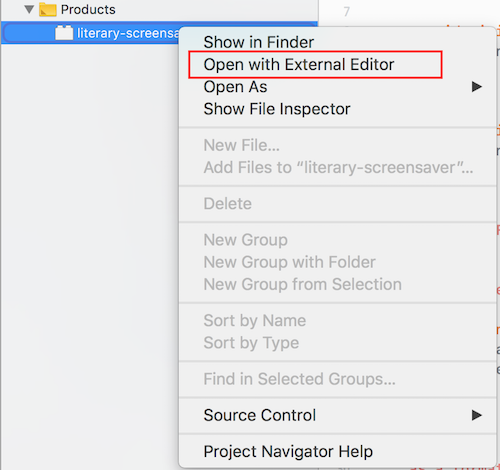
Now hit ⌘ + B to build the project! You should see a .saver file appear in the Products folder in the sidebar. Right click on it, and select Open with External Editor.
This will open System Preferences and prompt you to install the screensaver. Select whether you want to install it for all users, or just yourself. Finally, hover your cursor over the thumbnail, and click the Preview button to see it in action.
It’s quite painful to look at right now, with a bright red background and small, black text aligned in a dodgy way, but we’ll fix that soon.
Optimisations#
The above code calls for an entire redraw of the stage whenever animateOneFrame() is called, a watse of resources considering we’ll only update the quote every minute. To mitigate this, let’s simplify the time to only include the hour and minute, and add some logic to check whether a redraw is necessary based on whether the minute has changed since the last frame was rendered.
We’ll add an instance variable latestTime: String to store the latest time a quote was displayed for. When each frame is to be updated, we can grab the current time and compare it with this property – if they’re different, we’ll redraw, otherwise we’ll do nothing.
On top of this, we can reduce the interval with which animateOneFrame() is called by setting the animationTimeInterval property. Five seconds seems like a reasonable middle ground; I don’t really mind if it’s five seconds past the minute and the quote hasn’t yet refreshed.
...

class Main: ScreenSaverView {

    var latestTime: String = ""

    override init?(frame: NSRect, isPreview: Bool) {
        super.init(frame: frame, isPreview: isPreview)

        animationTimeInterval = 5
    }

    ...

    override func animateOneFrame() {
        let time = getTime()

        if time != latestTime {
            clearStage()
            drawText(time)
        } else {
            latestTime = time
        }
    }

    ...

    func getTime() -> String {
        let date = Date()
        let formatter = DateFormatter()
        formatter.dateFormat = "HH:mm"

        return formatter.string(from: date)
    }

    ...

}
Great! Now we’re probably far less resource intensive.
Parsing the quotes#
So far we’ve built a rudimentary screensaver capable of changing some arbitrary text on the stage every five seconds. Let’s extend this basic model to do what we actually want – display literary quotes!
Jaap, from the Instructables article, provides a comprehensive .csv file of quotes which feature the time of day. The document is formatted with pipe (|) separators with the following columns:
- Timestamp in HH:mm
- Specific subquote from the quote which represents the time
- Quote
- Book title
- Author
The following is an example:
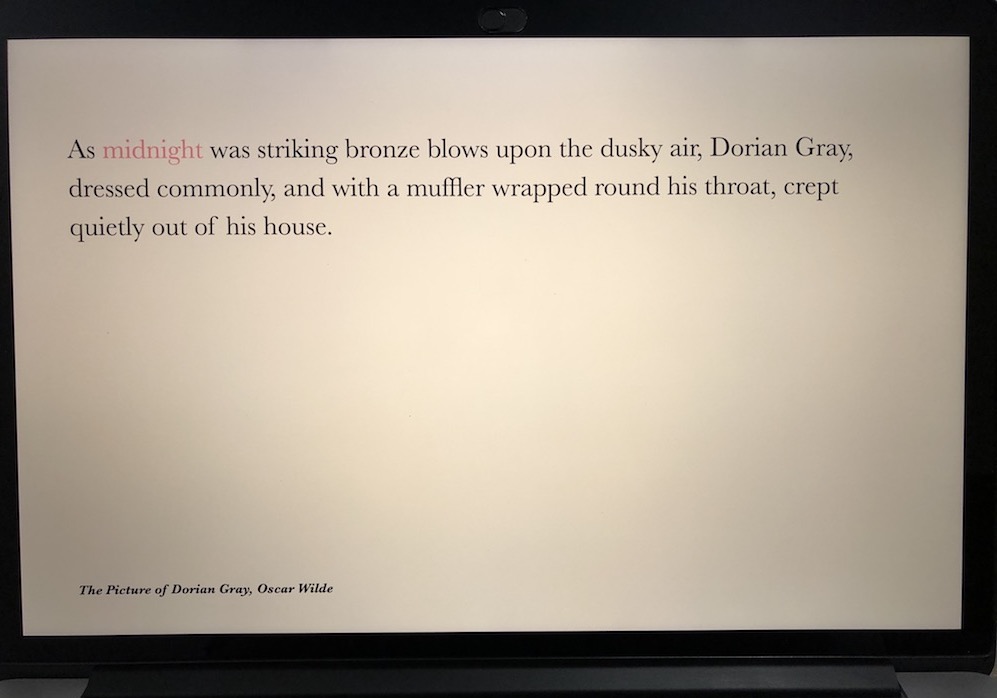
00:00|midnight|As midnight was striking bronze blows upon the dusky air, Dorian Gray, dressed commonly, and with a muffler wrapped round his throat, crept quietly out of his house.|The Picture of Dorian Gray |Oscar Wilde
This should be fairly easy to parse, let’s do it!
Firstly, we’ll create a new struct for our quotes so they’re easier to handle:
struct Quote {
    var time: String
    var subquote: String
    var quote: String
    var title: String
    var author: String
}
These are going to be initialised for each row in the CSV file, and stored in an array instance variable to be used later.
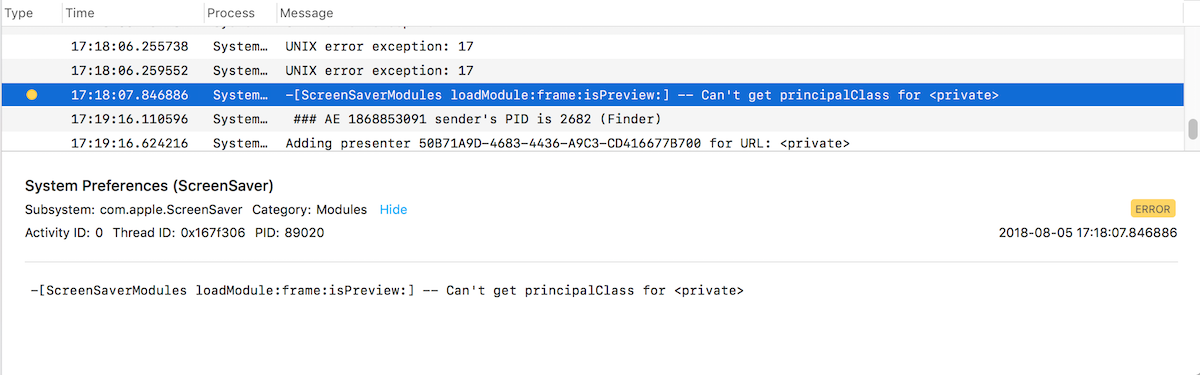
I’m lazy, so we’ll grab an off-the-shelf CSV parsing library. This
one looks alright. Install it with CocoaPods (or using one of the other options) and we’ll implement it as part of our class.
Welp, that didn’t work 😢. Looks like screensavers don’t play nicely with external frameworks for some reason:
Let’s do this the old fashioned way and write our own parser (visiting Google for inspiration of course).
import Foundation

...

class Main: ScreenSaverView {

    ...

    var quotes: [Quote] = []

    override init?(frame: NSRect, isPreview: Bool) {
        super.init(frame: frame, isPreview: isPreview)

        ...

        // Read in the quotes CSV.
        self.quotes = readCSVToQuoteArray(fileName: "litclock_annotated")
    }

    func readCSVToQuoteArray(fileName: String) -> [Quote]! {
        let path = Bundle(for: type(of: self)).path(forResource: fileName, ofType: "csv")
        let contents = try? String(contentsOfFile: path!, encoding: .utf8)

        // Parse the CSV file into a 2D array, separating the rows by the newline character, and each
        // column by the pipe symbol.
        let parsedCSV: [[String]] = contents!.components(separatedBy: "\n").map{ $0.components(separatedBy: "|") }

        // Map each record to a new instance of Quote struct, returning the resulting array.
        return parsedCSV.map {Quote(time: $0[0], subquote: $0[1], quote: $0[2], title: $0[3], author: $0[4])}
    }

    ...

}
Now we should have an array of Quote structs populated once our screensaver starts.
Finding what we need#
The next step is to filter the array to find a quote which matches the current time. There are multiple quotes for some times, and missing quotes for others. As a first cut, let’s grab the first element which matches the current time, and if we don’t get anything, we’ll display a default quote instead.
Later on we’ll optimise this behaviour using a dictionary to group arrays of quotes based on their time. We’ll gain O(1) access times with this method, and the ability to randomise the selection of a quote for times where multiple quotes exist.
Here’s a simple function to return the first quote which matches the given time. If we don’t find anything, we’ll return the very first quote ingested from the CSV.
func getQuoteFor(time: String) -> Quote {
    let quotesForTime = self.quotes.filter { $0.time == time }

    if quotesForTime.count > 0 {
        return quotesForTime[0]
    } else {
        return self.quotes[0]
    }
}
Putting it all together#
We can now change our animateOneFrame() function to retrieve and display the actual quote rather than the time:
override func animateOneFrame() {
    let time = getTime()

    let quote = getQuoteFor(time: time)

    if time != self.latestTime {
        clearStage()
        drawText("\(quote.quote)\n\n\(quote.title)\n\(quote.author)")
    } else {
        self.latestTime = time
    }
}
We’ll also update drawText(_ text:) and clearStage() with some styling enhancements, namely to remove the ghastly red background, and format the quote in a semi-decent manner:
func drawText(_ text: String) {
    NSColor.gray.set()

    let font = NSFont(name: "Baskerville", size: 48)
    let attributes = [NSFontAttributeName: font]

    text.draw(in: CGRect(x: 100.0, y: 200.0, width: 1400, height: 700), withAttributes: attributes)
}

func clearStage() {
    NSColor(red:1.00,green:0.97,blue:0.89,alpha:1.00).setFill()
    NSRectFill(self.bounds)
}
Touch-ups#
That looks okay, but we can still make some improvements before the challenging bit begins. Let’s separate the functions which draw the quote and the title/author, as we probably want different styling for each.
We can also do some refactoring by moving the colours and fonts to instance variables.
class Main: ScreenSaverView {

    ...

    let COLOUR_BACKGROUND = NSColor(red:1.00,green:0.97,blue:0.89,alpha:1.00)
    let COLOUR_QUOTE = NSColor(red:0.58,green:0.59,blue:0.62,alpha:1.00)
    let COLOUR_TIME = NSColor(red:1.00,green:0.55,blue:0.65,alpha:1.00)
    let COLOUR_METADATA = NSColor(red:0.31,green:0.31,blue:0.33,alpha:1.00)

    let FONT_QUOTE = NSFont(name: "Baskerville", size: 48)
    let FONT_METADATA = NSFont(name: "Baskerville-BoldItalic", size: 24)

    ...

    override func animateOneFrame() {
        let time = getTime()

        let quote = getQuoteFor(time: time)

        if time != self.latestTime {
            clearStage()
            drawQuote(quote.quote)
            drawMetadata(title: quote.title, author: quote.author)
        } else {
            self.latestTime = time
        }
    }

    ...

    func drawQuote(_ quote: String) {
        COLOUR_QUOTE.set()

        let attributes = [NSFontAttributeName: FONT_QUOTE]

        quote.draw(in: CGRect(x: 100.0, y: 200.0, width: 1400, height: 700), withAttributes: attributes)
    }

    func drawMetadata(title: String, author: String) {
        COLOUR_METADATA.set()

        let attributes = [NSFontAttributeName: FONT_METADATA]

        "\(title), \(author)".draw(in: CGRect(x: 100.0, y: 50, width: 600, height: 50), withAttributes: attributes)
    }

    func clearStage() {
        COLOUR_BACKGROUND.setFill()
        NSRectFill(self.bounds)
    }

    ...

}
Here’s what we end up with!
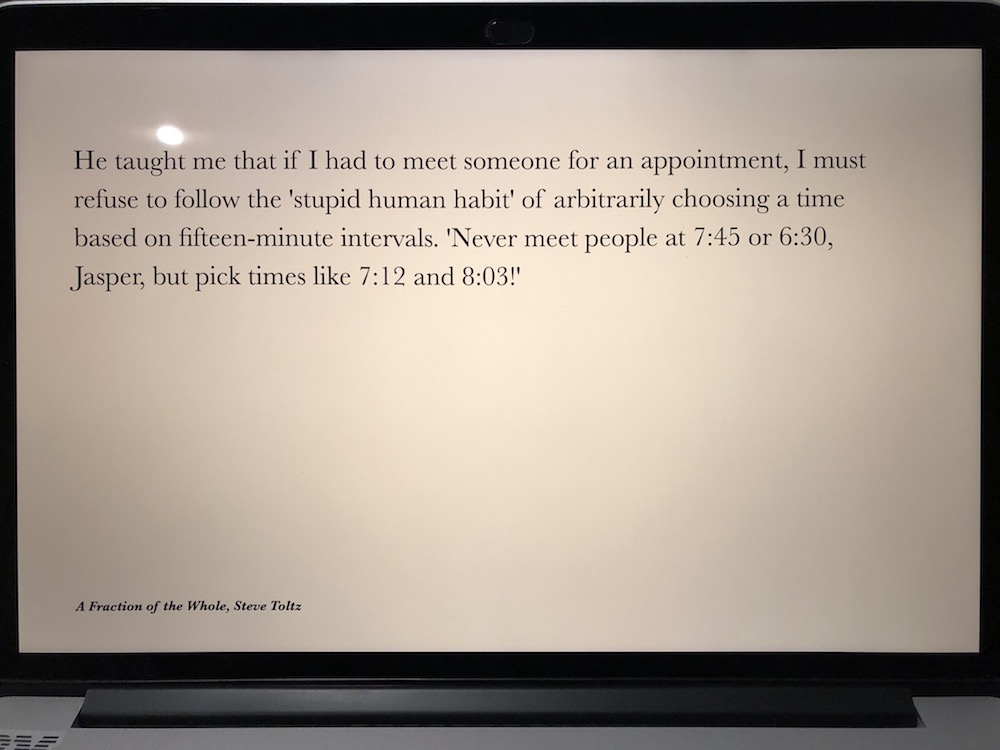
Not too shabby, besides the part where you can’t easily see what time the quote is referring to! An especially good example presented itself as I took the above photo.
Highlighting the time#
This screensaver would be pretty bad if it didn’t accomplish the main goal it set out to do - tell the time in the form of a quote. We need to somehow style the portion of the quote that refers to the time differently from everything else.
When I started this project on Sunday, I thought this would probably be the toughest part (I’m pretty naive when it comes to native development of any sort) as it could involve having to draw two differently styled strings on the same stage, and somehow order them appropriately based on the position of the substring within the quote…
Turns out it’s quite simple! Enter the world of the NSMutableAttributedString – boy that’s a mouthful.
The NSMutableAttributedString type is essentially a string on which we can apply attributes. The mutable part of the name tells us that we can arbitrarily apply and remove these attributes. So, what kind of stuff can we attribute to this string? Well, we sort of had a sneek peak in the last section, where we updated the drawQuote(_ quote:) function to style the quote with a different font. In that scenario – we applied the font change at the time of drawing the string onto the stage. This time, we want to do it a bit more cleanly by applying everything to the string before drawing it.
This StackOverflow post pretty much gives us the solution (look at the first answer). We can specify a string and its substring, find the range in which the substring occurs, and apply a different style to only that range of characters.
It goes something like this:
- First, we’ll grab the range of the portion of the quote containing the time. There’s a neat method
NSStringgives us to return a properNSRange.
let timeRange = (quote as NSString).range(of: subquote)
We cast quote, which is a String, to an NSString because its range(of:) method produces an NSRange, which is what the addAttribute(name:value:range) method expects us to provide. This range object defines the starting index of the substring, and its total length.
- Then, we can initialise our
NSMutableAttributedStringfrom the quote.
let styledQuote = NSMutableAttributedString(string: quote)
- Finally, let’s apply the time-specific and overall styling for the quote.
styledQuote.addAttribute(NSForegroundColorAttributeName, value: COLOUR_TIME, range: timeRange)
styledQuote.addAttribute(NSFontAttributeName, value: FONT_QUOTE, range: NSMakeRange(0, quote.count))
The uplifted drawQuote(:subquote:) function looks like this:
func drawQuote(_ quote: String, subquote: String) {
    COLOUR_QUOTE.set()

    let timeRange = (quote as NSString).range(of: subquote)

    let styledQuote = NSMutableAttributedString(string: quote)
    styledQuote.addAttribute(NSForegroundColorAttributeName, value: COLOUR_TIME, range: timeRange)
    styledQuote.addAttribute(NSFontAttributeName, value: FONT_QUOTE, range: NSMakeRange(0, quote.count))

    styledQuote.draw(in: CGRect(x: 100.0, y: 200.0, width: 1400, height: 700))
}
and renders quite nicely!